Sunday, August 19, 2012

Endless Summer

Thankfully we live in a climate where garden season seems to last forever. We started with snap peas and lettuce and we will end with peppers and tomatoes. Lately, our strawberries have been popping, and it's like Christmas every time I go out and hunt for those juicy red morsels. These are the BEST strawberries I've ever had and so cool that whenever I want a sweet treat, I can just walk outside and grab a handful. 

We tried a new cucumber variety this year - Armenian cucumbers. They stay yellow and get HUGE. Unfortunately, so far their flavor hasn't been all that great. In fact, they sort of taste like a very dilute and salty honeydew. Ew. But, one of them grew in the shape of a J, so I can't give up on them yet!! And check out that radish below. Hideous and alien, but zesty and fresh.


Monday, August 13, 2012

Potstickers

My mom is an excellent cook and one of her favorite things to make for people is Pot Stickers. A few years ago when I was visiting the fam in Bozeman, we all sat down and made Pot Stickers together. At the time, I didn't pay much attention to the recipe, which befuddles me because knowing what I know now, I don't have a clue how I survived over the years without these savory treats.

It all started when my friend Maren was about to have a baby and I wanted to come up with a  fun, unique, and yummy dinner to deliver to her family after the baby was born. I immediately thought about creating home-made chinese take-out, which got me thinking about those pot stickers. 

Pot stickers are relatively easy to make but they do take some time, so be patient and don't leave them to the last minute!

Pot Sticker Ingredients:
  • 1 pkg wonton/pot sticker wraps (round) - I couldn't find round, so I bought square and trimmed off the corners.
  • 1 lb ground pork (not sausage!) - This was not as easy to find as I thought it would be!
  • 1 egg, slightly beaten
  • 1 can water chestnuts, finely chopped
  • 2 tsp grated ginger root - (Cool trick alert! The leftover root can be frozen in a ziplock)
  • 3 green onions
  • 8 black mushrooms - dried in a package in the produce section. Follow instructions on the package before using.
  • 4 tsp soy sauce
  • 1 tsp sesame oil
  • 1/4 tsp black pepper
Dipping Sauce:
  • 2 tbls Soy sauce
  • 2 tbls Rice vinegar
  • chili paste (tiny bit!)
  • sesame oil (couple splashes)
  • 1 tbls brown sugar
  • Add more of above ingredients to your liking
Mix raw pork, water chestnuts, ginger, green onion, soy sauce, mushrooms, pepper, and sesame oil in a medium bowl. See how easy!?  Put 1-2 tsp of mix in wrapper. Use egg wash around the rim of wrapper and seal by pinching. Place on wax paper so that they don't stick.

Pre-heat 2-3 tbls vegetable oil in a skillet. Add pot stickers and cook until browned on bottom. Once browned, add 1/2 cup water and cover for 5 minutes. (Be careful when you add the water, as it will splash and sizzle all over the place!!)  You may have to work in batches.

Serve with dipping sauce and enjoy!!


For the dinner delivery, I also made the Thai peanut noodle dish, and some Jasmine rice, a bag of seaweed snack from Trader Joe's (Maren's fave!) and a bag full of plums from our plum tree!  I put everything in cute little chinese delivery boxes from Cost Plus (lined with parchment paper!). 


Saturday, July 28, 2012

Summer Plum Crostata

When my best Italian friend, Francesca, was here two years ago for an internship at my work, she made us a a sweet little summertime dessert called a crostata. Crostata's are traditional Italian dessert tarts that are filled with any jam or fruit you desire. One of the things I learned about Italy from Franci was that they use weights for measuring out amounts of ingredients rather than quantities like we do. Francesca's mother sent her family recipe all written out in grams, and Franci had to convert all of the weights to teaspoons and cups!


I was flipping through Food & Wine magazine earlier this month and came across a Summer Plum Crostata recipe! When I saw it, it brought back such fond memories of that summer with Franci and the delicious tart she made. It was also perfect timing because our plum tree was completely packed with plums and I needed a creative solution for using them up. So, I gave it a try!


Summer Plum Crostata
6 servings

  • 1 1/4 cups all-purpose flour, plus more for dusting
  • 1/2 cup sugar, plus more for sprinkling
  • 1/4 teaspoon salt
  • 1 stick cold unsalted butter, cubed and chilled (this is important!)
  • 1/4 cup ice water
  • 1 teaspoon cornstarch
  • 1/4 teaspoon finely grated orange zest
  • 1 pound firm-but-ripe plums, pitted and cut into eighths
  • 1 large egg yolk mixed with 1 tablespoon of water


In a food processor, add the 1 1/4 cups of flour, 2 tablespoons of sugar and the salt. Pulse to combine. Add the butter and pulse until the mixture resembles coarse meal. Sprinkle on the ice water and pulse until the dough just barely comes together. (You don't have to use the entire 1/4 cup of ice water - just add until the dough comes together). Gather the dough and pat into a disk. Wrap the dough in plastic and refrigerate until chilled, about 30 minutes. 


Preheat oven to 425 and position a rack in the lower third. Line a baking sheet with parchment paper. Working on a lightly floured surface, roll out the disk of dough to a 12-inch round and transfer to the baking sheet. Chill the dough until firm, 15 minutes.

Meanwhile, in a bowl, combine the remaining 1/4 cup plus 2 tablespoons of sugar with the cornstarch, cinnamon, and orange zest. Add the plums and toss well. Let stand, stirring occasionally, until the sugar is mostly dissolved, about 15 minutes.


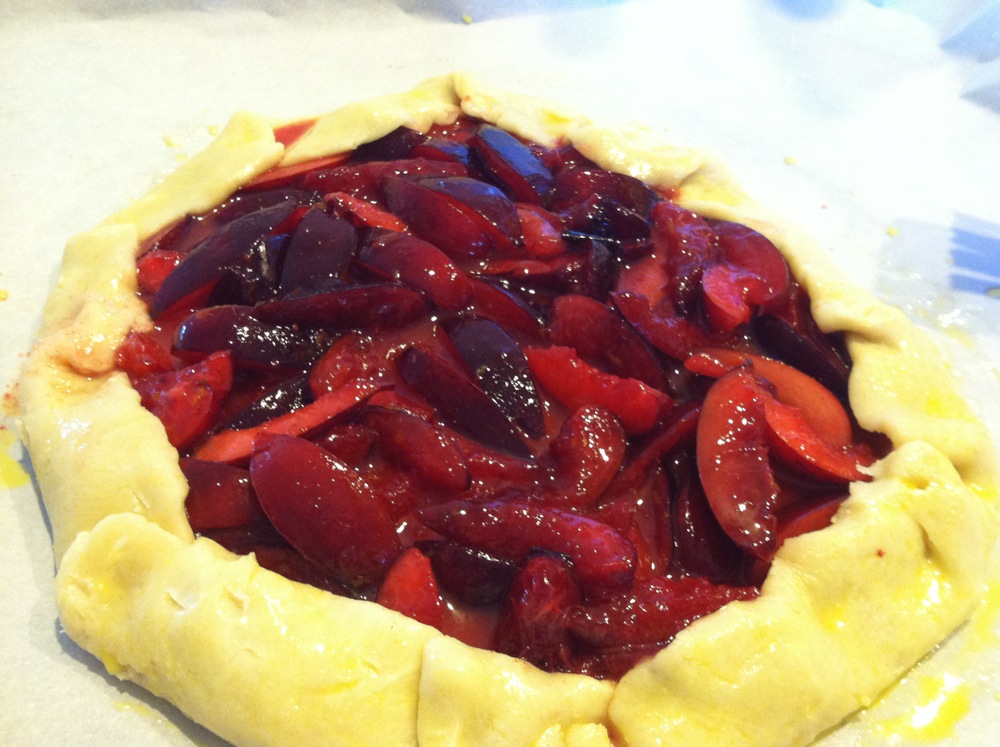
Arrange the fruit in the center of the dough, leaving a 1 1/2 inch border all around. Fold the edge of the dough up and over the plums. Brush the rim with the egg wash and sprinkle with sugar.


Bake the plum crostata for about 50 minutes, until the crust is golden and the fruit is tender and bubbling. Let the crostata cool on the baking sheet for 30 minutes, then cut into wedges and serve. 


The pastry disk can be refrigerated for up to 3 days if you want to make ahead.

I also made extra filling and put it into quart size freezer bags to use up all of our surplus plums!


Wednesday, July 4, 2012

Cake Batter Chocolate Bark

The other thing I made for our company Bake Sale was Cake Batter Chocolate Bark. Another Pinterest find originally from the blog How Sweet It Is. It was probably one of the easiest things I've ever made, although a bit expensive if you buy the good chocolate. 

Ingredients:
  • 6 oz high quality dark chocolate (I used Lindt 70%)
  • 12 oz high quality white chocoolate (I used Ghirardelli)
  • 3 teaspoons of yellow cake mix (although, I think you could use more. Just be sure to add in a little at a time to make sure it all dissolves in the warm chocolate.
  • sprinklers of your choice
  • Foil cake pan lined with parchment paper
Melt the dark chocolate in a double boiler. Pour the chocolate into the pan. Smooth it out with a spatula to the thickness you want. You don't have to go all the way to the sides. Stick whole pan in the freezer for 20 minutes. 

Melt white chocolate. Whisk in cake mix slowly, stirring well until no lumps remain. Let it set for 3 full minutes or until it slightly thickens. Remove baking sheet from freezer and pour white chocolate mix on top. Smooth out quickly so that it doesn't start to melt the bottom layer. 

Sprinkle on sprinklers and freeze again for 20 minutes.

Once set, break into chunks and keep refrigerated.


For the sale, I put a few pieces in clear favor bags and tied a bow around it. It was the perfect little  festive treat. This would also be a good treat for birthday parties, showers, or holidays with coordinating colored sprinkles.

Thursday, June 21, 2012

Summer Cake

This week we had a bake sale at work and this was one of my contributions! A red velvet cake with cream cheese frosting. Okay, so I used a box cake, but I added a secret ingredient (ok, I will tell you! 1 cup of sour cream in the mix!). But really, this cake is all about the gorgeous, summery decor! I totally stole this idea from Pinterest (of course), but I think it came out so lovely, don't you! 


Wednesday, June 20, 2012

SLO Life Magazine


Herbivores

I took these photos of the garden about two weeks ago. Now the lettuce and snap peas are just about done but the tomatoes, cucumbers, and melons are just getting started! Pretty soon we will have so many cucumbers again we will have to start pickling again. That or lots of cucumber, mint mojitos! 

Romaine lettuce - my fave

Cucumbers and cantaloupe

The peaches are coming in nicely. Just like the color of a sunset. Hope we get to them before the birds do!
A new addition to the garden this year - snap peas!

Remember when these snap peas looked like this?

The radishes are ready! (Rad-i?)

Holy Popeye! I put the camera lens on the spinach leaf so you can see how big it is. So big, I squealed every time I went out to the garden. Almost mutant looking.

We had one tiny little strawberry about the size of a marble. But, Steve had to pick it because apparently the first year of growing strawberries, you are supposed to pick off any new fruits so that the plant's energy goes into making healthier plant leaves rather than fruit. Then, next year we will have a full crop! I cannot wait because even that little marble berry was like sweet sugary heaven!

 Yesterday I found two green Early Girl tomatoes! They are definitely living up to their name because last year we didn't get one tomato until October!!!

Monday, June 4, 2012

Homemade Snickers Bars

Just for fun, I decided to try a new sweet treat that I came across on Pinterest. Homemade snickers bars.  They were incredible and tasted almost exactly like the real thing!! This recipe makes an entire tray of snickers bars so of course, I brought them into work and they were gone instantly. 

Recipe from How Sweet It Is found from Pinterest.

Makes one 9 x 13 pan

Bottom Chocolate Layer:
  • 1 1/4 cups milk chocolate chips
  • 1/4 cup peanut butter
Thoroughly grease your baking pan. Melt ingredients together in a saucepan and spread until even. Let cool and harden completely.


Nougat Layer:
  • 1/4 cup unsalted butter
  • 1 cup granulated sugar
  • 1/4 cup evaporated milk
  • 1 1/2 cups marshmallow fluff (YES!!!)
  • 1/4 cup peanut butter
  • 1 1/2 cup salted peanuts chopped, roughly chopped
  • 1 tsp vanilla extract
Melt butter in a saucepan over medium heat. Add in sugar and milk, stirring until dissolved and bring to a boil. Let cook for 5 minutes, stirring occasionally. Add in fluff, peanut butter and vanilla, stirring until smooth. Turn off heat and fold in peanuts, then pour over bottom layer of chocolate. Let cool completely.


Caramel Layer:
  • 1 14 oz bag of caramels
  • 1/4 cup whipping cream
Combine ingredients in a saucepan over low heat. Let melt, stirring occasionally, until smooth, about 10 minutes. Pour over nougat layer and let cool completely.

Top Chocolate Layer:
  • 1 1/4 cups milk chocolate chips
  • 1/4 cup peanut butter
Melt ingredients together in a saucepan, then pour over caramel and spread  until even. Let cool and harden completely.


Refrigerate for at least one hour before serving, then cut as desired. These can stay at room temperature, but they do get gooey. Refrigerated is best!

For best results, use one of the aluminum cake pans at the grocery store that way you can pop out the entire rectangle and cut.

Wednesday, May 30, 2012

Thai Peanut

One of my new favorite recipes and regular week night go-to's is a Thai peanut chicken dish. My mom introduced me to this dish when I visited her earlier this year in Seattle. It was one of the best meals of my life....I might die. My mom used one of those Thai Kitchen Noodle kits that comes with the rice noodles, seasonings, and peanut sauce. She added crushed peanuts, sambal oelek (spicey chili paste)  cilantro, lime juice, crunchy bean sprouts, chicken, and white rice. You drooling yet?! 

Well, when I got home I wanted to re-create this masterpiece but I couldn't find the Thai Peanut noodle kit anywhere!! My mom mailed me a kit and I made the dish but forgot the cilantro  and lime juice and Steve said the chicken pieces were too big. Boo! So, I tried again, this time kit-less. I bought some thai peanut sauce, rice noodles, sambal oelek, and sesame oil, remembered the cilantro and lime, and cut the chicken into tiny pieces! Whew!! My home-made version of the Thai Kitchen recipe was just as good, and now I have lots ingredients to make it again!! 

Here's what you will need if you can't find the Thai Kitchen box:
  • chicken breast
  • white rice
  • rice noodles
  • crushed up peanuts
  • bean sprouts
  • cilantro
  • lime juice from fresh limes
  • sambal oelek chili paste
  • sesame oil
  • Thai Peanut Sauce
  • any other veggies of your choice

Cook the chicken and saute the veggies in the sesame oil and peanut sauce. Add a quarter size dollop of chili paste and mix. (Use less if you don't like spicy food. A little bit of this stuff goes a LONG way!) Cook the rice and rice noodles. Add the bean sprouts just before you're ready to serve so they get only slightly cooked. Add the rice noodles to the chicken, veggie mix. Dish out over the rice. Sprinkle with cilantro and a squeeze of lime juice. Top with crushed peanuts. 


Mom's Thai Kitchen dish

My home-made Thai Peanut dish

Tuesday, May 29, 2012

Hawaiian Style

The theme for my Grandpa's 80th birthday was Hawaiian Luau. I thought pineapple fried rice and rainbow fruit skewers would be the perfect addition to bbq'd ribs and veggie kabobs. 

Pineapple Fried Rice
  • Cooked white rice
  • yellow onion chopped
  • chopped roasted red pepper
  • small bits of pineapple
  • frozen peas
  • cashews
  • eggs
  • sesame oil
  • olive oil
  • cumin
  • S&P
Saute the yellow veggies in olive oil and a tbsp of sesame oil. Add the egg mix up lightly so it scrambles and fries up with the veggies. Add salt, pepper, cumin, to taste. Add the cashews and rice and mix until all cooked and warmed together. SIMPLE and DELICIOUS!

My second dish was rainbow fruit skewers that I found on Pinterest. My mom found the cutest skewers with flowers on the ends and I had help from my little cousins putting these little skewers together. I used blackberries, blueberries, kiwi, pineapple, oranges, and raspberries and they turned out so cute and festive!! They were a big hit!


Related Posts Plugin for WordPress, Blogger...